hexo + gitalk 给博客添加评论系统
由于第三方评论系统基本全部扑街,所以不得不想其他对策,网上也有人提出搭建自己的第三方评论系统,但是需要自己有VPS呀,或者阿里云申请云主机?no,没钱!
然后今天看到了gitalk,一个基于Github Issue和Preact 开发的评论插件。虽然还有一些小问题,但是从此我的博客有评论系统了,撒花~~
详情Demo可见:https://gitalk.github.io/
具体操作步骤如下:
1.申请github应用
在GitHub上注册新应用,链接:https://github.com/settings/applications/new
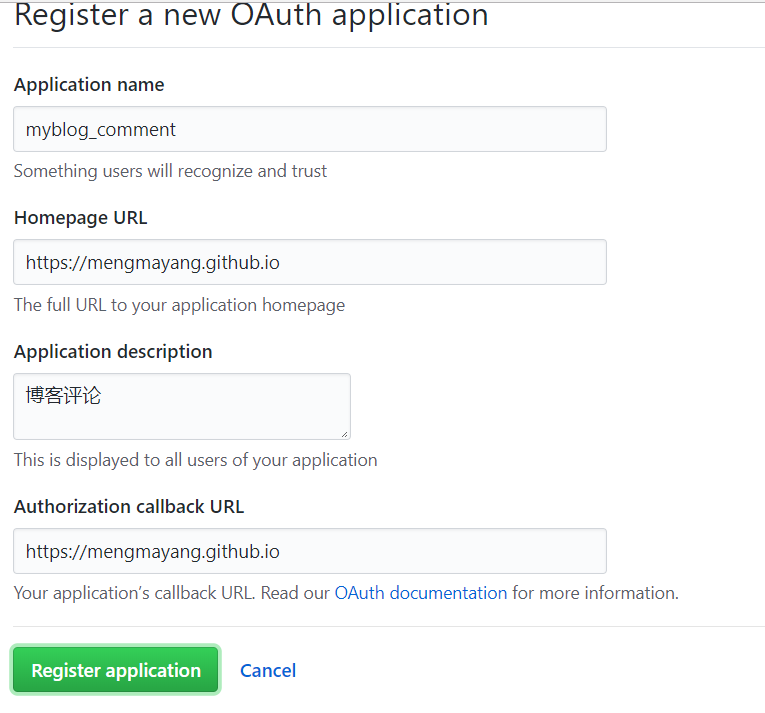
参数说明:
Application name: # 应用名称,随意
Homepage URL: # 网站URL,如https://mengmayang.github.io
Application description # 描述,随意
Authorization callback URL:# 网站URL,https://mengmayang.github.io
然后你会得到Client ID和Client Secret
2.新增gitalk.swig
新建/layout/_third-party/comments/gitalk.swig文件,并添加内容:
1 | {% if not (theme.duoshuo and theme.duoshuo.shortname) and not theme.duoshuo_shortname %} |
3.comments.swig
修改/layout/_partials/comments.swig,添加内容如下,与前面的elseif同一级别上:
1 | {% elseif theme.gitalk.enable %} |
我因为开启了disqus的count功能,所以disqus的enable是true,因此在增加gitalk的时候最后几行是:
1 | {% elseif theme.valine.appid and theme.valine.appkey %} |
4.index.swig
修改layout/_third-party/comments/index.swig,在最后一行添加内容:
1 |
|
5.gitalk.styl
新建/source/css/_common/components/third-party/gitalk.styl文件,添加内容:
1 |
|
6.third-party.styl
修改/source/css/_common/components/third-party/third-party.styl,在最后一行上添加内容,引入样式:
1 |
|
7.修改_config.yml
在主题配置文件next/_config.yml中添加如下内容:
1 | # Gitalk |
8.安装md5
1 | npm install md5 |
9.关于评论初始化和ERROR的问题
初始化需要mengmayang授权,所以每一篇博客的评论都需要自己进行初始化

目前长标题的博客会有Error: Validation Failed的问题,短标题则没有。

目前还没有解决的好办法,只能取短一点的标题喽~~
参考
https://www.jianshu.com/p/0bca03b43157
https://asdfv1929.github.io/2018/01/20/gitalk/
https://github.com/geedme/gitalk/issues/3
https://github.com/gitalk/gitalk/issues/115#event-1539518527
